

Magento SEO in 2026: Rank in Google and AI Search
Summary
Key takeaways
-
Fix index bloat first — it’s the single biggest lever on most Magento stores.
-
Core Web Vitals now hinge on INP (target <200ms); Hyvä or headless is the structural fix.
-
Complete Product schema (GTIN/MPN/brand) — it’s now an AI-citation play, not just rich results.
-
Set a deliberate AI-crawler policy and structure copy answer-first to win AI Overviews.
-
The article frames technical SEO as the main lever to reach page-one visibility, and notes Magento has built-in settings to support it (URLs, robots.txt, sitemaps, headings).
-
Strong SEO starts with metadata: homepage title, plus category/product meta titles & descriptions to improve snippet CTR (even if meta tags aren’t direct ranking factors).
-
For large catalogs, Magento’s Product Fields Auto-Generation can template product meta tags, but it has limitations (e.g., not retroactive; description length constraints).
-
Duplicate content is positioned as Magento’s biggest SEO risk; the core fix is canonical tags + (careful) category paths for product URLs.
-
Magento lets you create SEO-friendly URLs (clean URL keys, hierarchy) and manage changes via URL rewrites/permanent redirects.
-
Indexing control is a major theme: configure robots.txt, meta robots, and XML sitemap settings (frequency, priorities, images).
-
Image SEO matters too: add descriptive alt text for product images (and even store logo).
When This Applies
-
You’re on Magento 2 and want a practical technical SEO setup: metadata, duplicate-content control, crawl/index directives, and clean URL structure—especially for multi-category catalogs and frequent URL changes.
When This Doesn’t Apply
-
You’re not on Magento 2 (the steps are Magento-admin specific), or your core issue is not technical SEO (e.g., weak product-market fit or no content strategy) and you’re looking for broader growth guidance beyond platform configuration.
Checklist
-
Set a branded homepage title (include your site name in the title).
-
Configure page title prefix/suffix so your brand appears across key pages.
-
Add category meta title + meta description (stay within the character limits noted in the article).
-
Add product meta tags, and if you have many SKUs, configure Product Fields Auto-Generation templates.
-
Manually refine meta descriptions where needed (auto-gen isn’t retroactive and has limits).
-
Enable canonical link meta tags for categories/products to reduce duplicate content.
-
Decide on category paths for product URLs; if enabled, pair it with canonicals to avoid conflicts.
-
Rewrite URL keys to be readable, keyword-relevant, and hierarchical (category/product).
-
If changing URLs, enable Create Permanent Redirect for URLs to preserve traffic and avoid broken links.
-
Review URL suffix strategy (especially for international/language variants) and plan redirects if changing suffixes.
-
Configure robots.txt in admin (what should/shouldn’t be crawled).
-
Set meta robots rules (INDEX/FOLLOW, NOINDEX/FOLLOW, etc.) for page groups like thank-you/admin/utility pages.
-
Generate/configure the XML sitemap (update frequency, priorities, include images where relevant).
-
Add alt text to product images (and logo) with descriptive language (avoid keyword spam).
-
Track ranking changes with a rank-tracking tool if needed (the article references this workflow).
Common pitfalls
-
Assuming meta auto-generation will fix existing products (it’s not retroactive).
-
Enabling category paths without canonicals and triggering duplicate-content issues.
-
Changing URL suffixes or URL keys and not setting permanent redirects, causing 404s and traffic loss.
-
Overusing NOINDEX/NOFOLLOW and accidentally blocking valuable pages from indexing.
-
Writing alt text that’s vague or keyword-stuffed instead of truly descriptive.
-
Treating sitemap/robots as “set once” and not revisiting config as the catalog and URL structure evolves.
Magento SEO (Adobe Commerce SEO) is the work of making a Magento store rank in Google and get cited in AI answers: consolidate duplicate URLs to canonicals, complete product structured data, pass Core Web Vitals, and structure content so AI Overviews and assistants can extract it. On Magento it’s technical first — most stores index 5–10× more URLs than they have products, and that bloat is what suppresses rankings.
You don’t exist for your customers unless your store is on the first page of Google. There, we said it.
By and large, customers have no idea what brand to choose when shopping online; they google an item and see the stores that come up on the first page of SERP. But how do you get there? The answer is: technical SEO.
With Magento, search engine optimization becomes easy. Don’t worry, we’ll show you how. Read on to find a handy Magento SEO guide on how to leverage the platform’s built-in tools and settings and drive up the traffic to your online store. Find a bonus Magento SEO checklist to download at the end of the article. Let’s dive right in!
What Is Magento SEO?
Search engine optimization (SEO) is a set of practices to help Google and other search engines crawl and index your website faster.
Technical SEO stands for behind-the-scenes optimizations, including website architecture, page load speed, data markups, etc. But you can do a lot of it on your own. Magento offers quite a few settings to create SEO-friendly URLs, build robots.txt sitemap, use headings on a webpage correctly, etc.
Why does Magento SEO look different in 2026?
Because search became answer-first. AI Overviews now appear on roughly 48% of Google queries and trigger most heavily on informational searches, and only ~38% of AI-Overview-cited pages also rank in the top 10 (Ahrefs). That means AI Overviews increasingly pull information from beyond the first page of search results. The good news: strong technical SEO is still the foundation, because Google consistently favors well-structured, crawlable, authoritative content when selecting sources. You’re optimizing for both rankings and AI citations at the same time.
Most Magento stores have 5–10× more URLs in Google’s index than they have products. Fixing that is the single biggest lever.
How do I fix Magento’s index bloat?
Consolidate. Faceted navigation and URL parameters are the classic Magento crawl trap. In 2026 the guidance is to manage crawl paths, not just hide parameters: apply canonical tags so every variant points to one definitive URL, prefer clean top-level product URLs (predictable URLs help AI systems tie a product to a single entity), keep key category pages crawlable, and prune thin parameter pages. Audit monthly with Screaming Frog or Semrush — the gap between indexed URLs and real products is your worklist.
How do I pass Core Web Vitals on Magento?
Start with INP. Interaction to Next Paint replaced FID as a Core Web Vital — target under 200ms, fix anything over 500ms. Magento’s RequireJS/Knockout frontend is the usual culprit when filters lag. Tactics: full-page caching (Varnish), Redis, PHP 8+ and MySQL 8, a CDN, WebP/AVIF images, and lazy-loading. The structural fix is a lightweight frontend — Hyvä replaces the legacy theme stack and lets most stores hit green vitals without endless patching.
INP (Interaction to Next Paint) measures how quickly a page responds to user interactions — clicks, taps, and key presses — from the moment of input to the next painted frame. It replaced First Input Delay (FID) as a Core Web Vital in March 2024 and is a tougher metric, because it tracks the slowest interaction across the whole visit, not just the first.
Thresholds (measured at the 75th percentile of real users): 200 ms or less is good; 200–500 ms needs improvement; over 500 ms is poor and can hold back rankings when everything else is equal.
How do I get a Magento store cited in AI Overviews?
Complete your structured data and write to be quoted. Magento’s native Product schema often ships without GTIN, MPN, brand, or attached AggregateRating — AI engines use exactly those identifiers to cross-reference products. Add complete Product + Offer + AggregateRating on product pages, BreadcrumbList site-wide, and FAQPage on category/CMS pages (only for genuine questions — Google tightened eligibility). Then write answer-first: lead each section with a clear, factual 40–60 word answer. AI-Overview-cited pages tend to be noticeably more fact-dense than non-cited ones, so density of attributed, specific information matters.
After a technical SEO and performance engagement on the BUFF Adobe Commerce store, an improvement in Core Web Vitals drove a 12%-18% lift in organic sessions — a real before/after showing how a cleaner technical foundation moves search visibility. For B2B stores, that foundation extends to the back office — see our guide to Magento ERP integration.
What about AI crawlers and agentic commerce?
Decide deliberately. GPTBot, ClaudeBot, PerplexityBot, and Google-Extended crawl ecommerce sites frequently; set your robots.txt policy on purpose (most merchants chasing AI visibility allow them, rate-limiting at the CDN if needed). Looking ahead, agentic shopping consumes data, not pages — Adobe Commerce’s API-first architecture suits it, provided attributes are clean and pricing/inventory are exposed in real time — the same foundation that powers Magento 2 B2B features like contract pricing and quoting.
A realistic 90-day sequence
- Month 1 — technical: canonical/parameter cleanup, INP, crawl-path audit.
- Month 2 — relevance: complete product/category schema, category content, internal-link
hubs. - Month 3 — authority & AI: reviews/AggregateRating, earned mentions, answer-first
AEO/GEO structuring.
How do I set up Magento metadata for SEO?
There are two reasons why you’d want to write compelling metadata for your webpages.
For one thing, unique and catchy meta titles should lure the user to follow the URL in Google search. And for another, included keywords will draw the attention of the crawlers and help you rank higher. If you want to check website rankings you can use Sitechecker. This tool has a daily rank tracking feature that will keep you up to date with any changes in ranking.
Configuring metadata settings is the first tip in this Magento 2 SEO guide. Let’s see how to make your website look attractive even before your customer lands on your homepage.
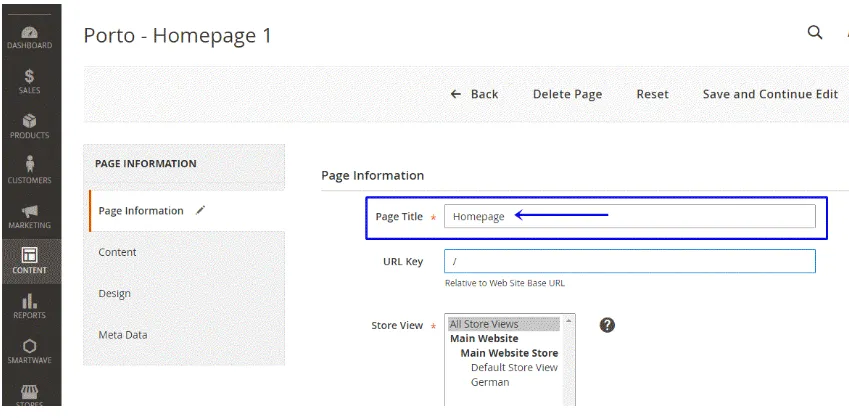
Homepage
It’s hard to stand out without a branded homepage title. Google itself recommends including your site name at the end of each page title and, most importantly, at the homepage.
By default, Magento 2 preserves a “Homepage” website title which will be displayed at the top of the browser. To customize the homepage tag, follow the path Content > Pages > Homepage > Edit. Type in the name of your brand and a few keywords to help Google spiders identify what you’re selling.
Metadata
Metadata includes titles and descriptions not displayed directly on the website. Instead, they are written into the code and notify the search engine of the contents and the purpose of your website. According to Google Search Central Blog, meta tags are not factored in by Google’s ranking algorithms. However, they will impact your page’s CTR (click-through-rate) and draw more relevant customers to your store.
Magento 2 SEO settings allow you to add metatags for two store sections: categories and products.
Meta Tags for Categories Settings
To start configuring metadata for categories in Magento, go to Catalog > Categories > Search Engine Optimization. Fill in three fields of meta title, meta description, and meta keywords for each category.
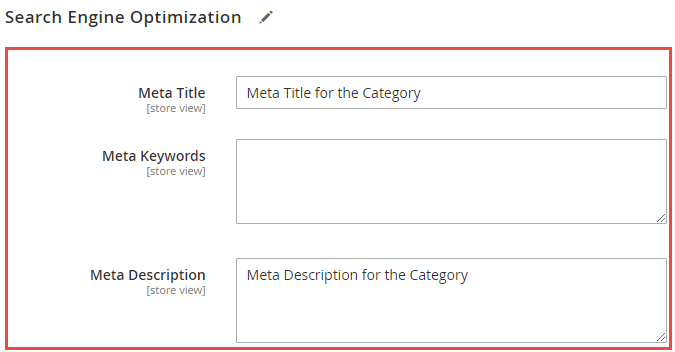
Mind that you can write 70 characters max for Meta Title and 255 characters max for Meta Description. Try to come up with a compelling and keyword-rich description that will tempt the user to click on it and will correspond to their search intent.
Use online software like MOZ or SEOmofo to preview your metadata as a snippet.
Meta Tags for Products Settings
Manually adding meta tags for products in Magento is similar to adding categories: Catalog > Product > Basic Settings > Search Engine Optimization. To make this process less tedious and time-consuming (especially for the stores with thousands of SKUs), Magento added a Fields Auto-Generation function. A merchant can create a template with meta title, description, and keywords for all products across your website.
To access the feature, follow Stores > Configuration > Catalog > Catalog > Product Fields Auto-Generation.
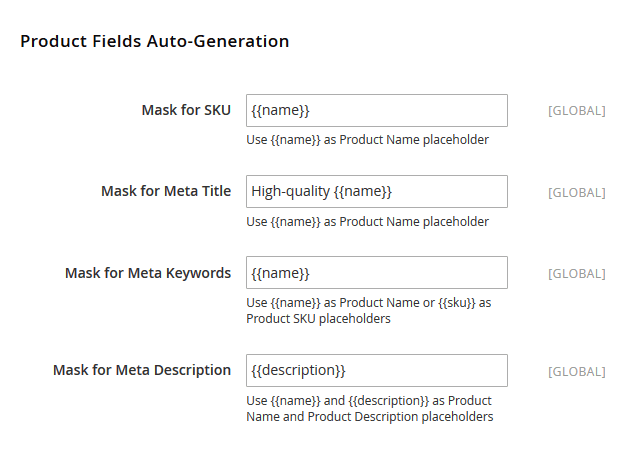
This Magento SEO optimization feature still has a few limitations:
- Character limitations specified in Categories metadata settings still apply. Since a meta description for a product is usually longer than 255 characters, we recommend editing this meta tag separately.
- The settings are not retrospective and apply only to newly created, imported, or migrated products. So if you’ve found a misspelling or want to edit the metadata quickly, the changes will not be automatically reflected in the existing products.
- The template applies globally, so you won’t be able to change metadata for particular products.
Expand Magento Metadata SEO settings with a custom extension
Build any Magento extension with Elogic and make your ecommerce SEO strategy hassle-free
Develop a Magento extension nowMicrodata / Rich Snippets
A snippet shows the meta title and meta description Google displays for a user’s search query. A rich snippet adds extra detail — stars, prices, ratings — and these are one of the most underused CTR levers: 2026 structured-data studies put the uplift at roughly 20–35% over plain results, because that extra detail gives searchers a reason to click before they land. It looks like this:
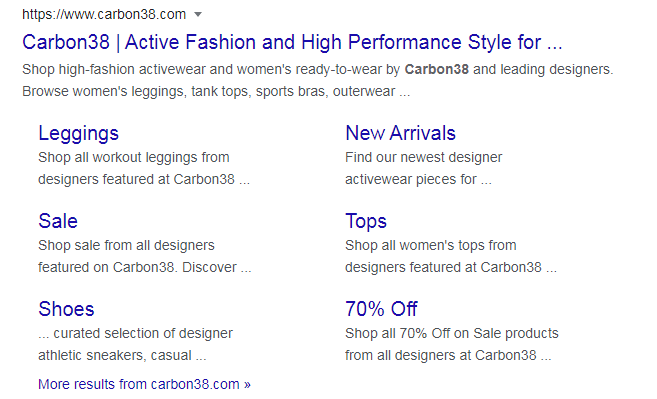
Rich snippets or microdata is a breakthrough of Magento 2 in comparison with Magento 1. The feature appears in all product pages by default and lists only basic tags (name, SKU identifier, rating, and price). You’d need to install an extension to add more microdata to a snippet, like stock availability or product description.
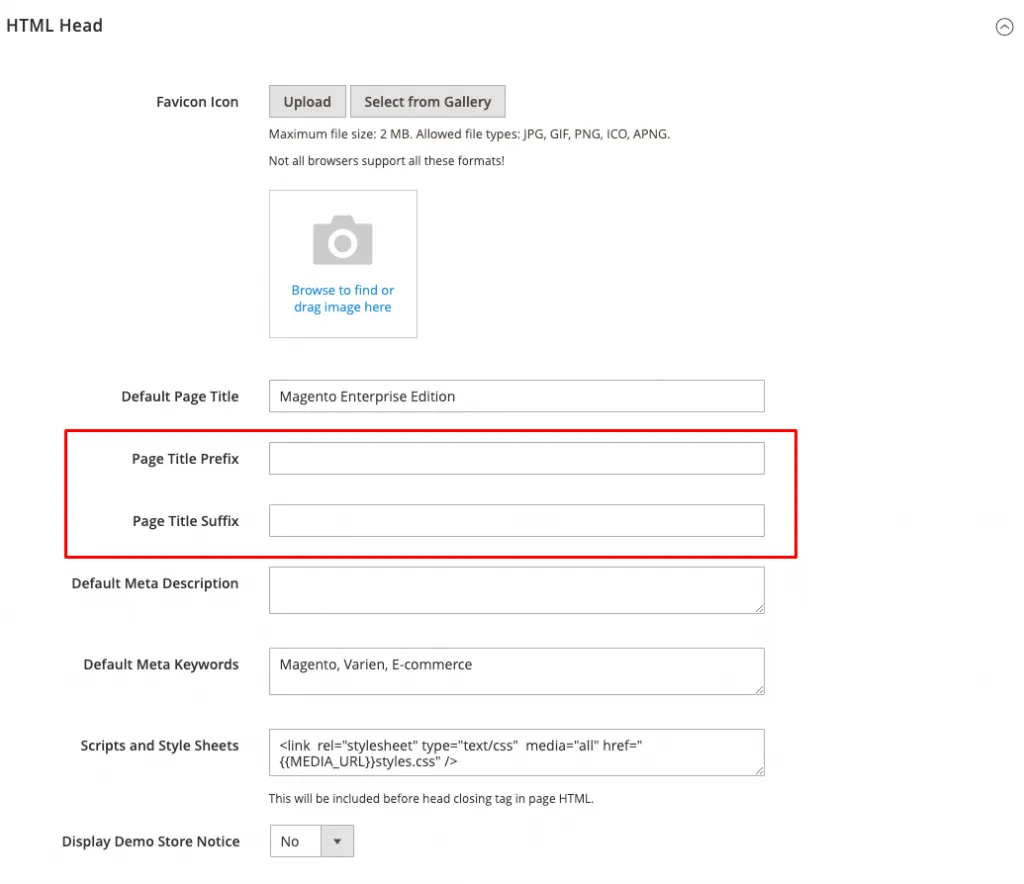
Prefixes and Suffixes for Title Tags
It’s a sign of good manners (and business) to have your brand name appear on all webpages of your store. Adding your company name as a prefix or a suffix to title tags will allow both new and returning users to recognize your brand. Usually, it goes as STORE NAME – PAGE TITLE for a prefix or PAGE TITLE – STORE NAME for a suffix.
To configure the settings, go to Content > Configuration > Website > HTML Head > Page Title Prefix & Suffix.
Need expert Magento SEO implementation? Our custom Magento development services team handles technical SEO, site speed optimization, and structured data implementation for enterprise stores.
How do I fix duplicate content on Magento?
The biggest threat to Magento SEO optimization is duplicate content. People often think of it as non-original, plagiarized content on the website; yet, it also concerns behind-the-scenes text and metadata.
Here’s how it can affect an ecommerce merchant. Because several products may belong to the same category but vary in size and color, their name and description will be pretty much the same but point to different links. Search engine crawlers won’t be able to determine which URL to index (more on that later in the article) and will lower your website performance.
How do you address duplicate content issues? One of the essential Magento SEO tips is to set canonical tags and category paths for product URLs.
On-page SEO improvements only deliver compounding traffic when paired with engineering-level performance work — a structured Magento performance optimization service addresses the Core Web Vitals, server response, and database query patterns that raw content optimization cannot reach.
Additionally, using tools like an AI image generator can help create unique visuals for your products, reducing the risk of duplicate visual content and improving user engagement.
Canonical Tags
Canonical is basically a fancy word for “official”. By setting a canonical tag, you notify a search engine of the “official version” of the webpage among the potentially many links with duplicate content.
Let’s see how a canonical tag works based on an example of Roller Rabbit, one of Elogic Commerce’s clients. This Swiss Dot Evita dress appears in two product categories: Mother’s Day and New Arrivals.
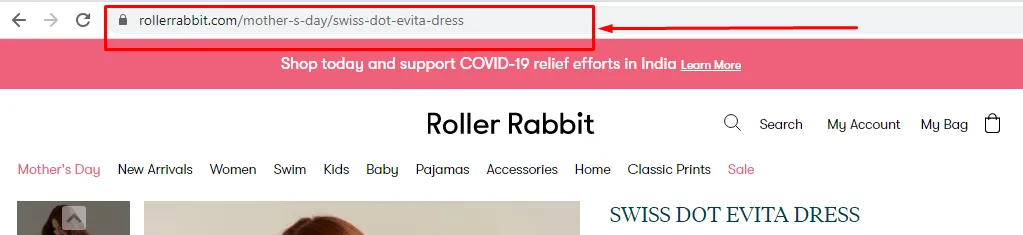
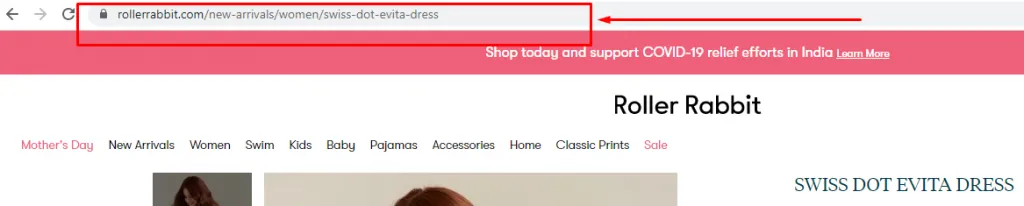
An added canonical tag specifies that the product pages should be treated as a copy of https://www.rollerrabbit.com/swiss-dot-evita-dress, and all the content metrics and ranking power should be actually accredited to the specified link.

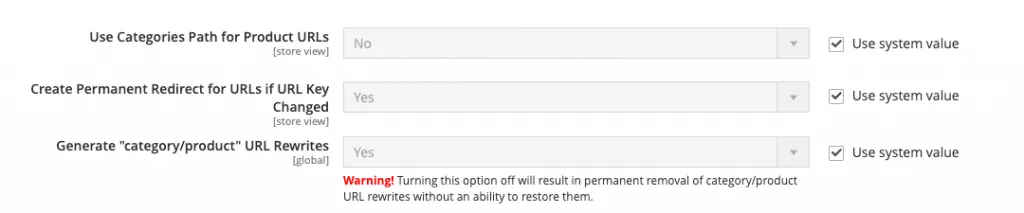
Cool right? Magento 2 merchants can set up the same canonical tag for categories and products to avoid duplicate content. Go to Admin > Stores > Settings > Configuration > Catalog. Scroll down to SEO and choose “Yes” for “Use Canonical Link Meta Tag for Categories/Products.”
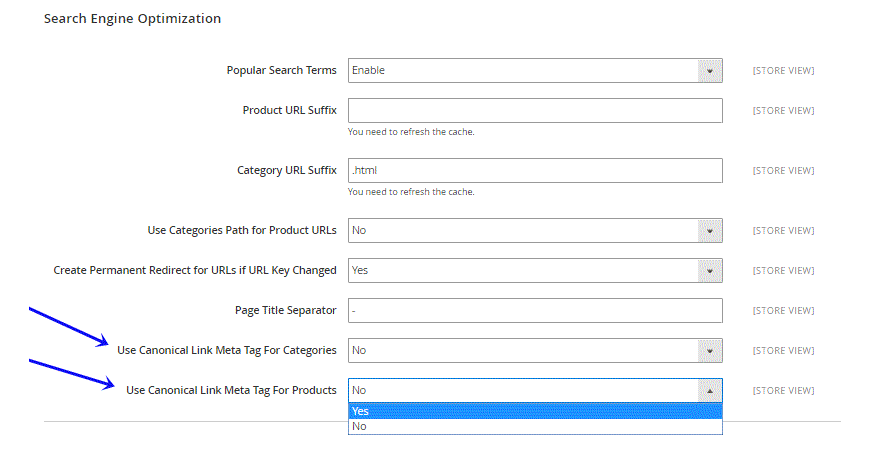
Category Path for Product URLs
Category paths show the logic of the store navigation and indicate the hierarchy of a webpage. The feature can be accessed from Stores > Configuration > Catalog > Search Engine Optimization.
If turned on, they help search engine crawlers index the page faster but may lead to duplicate content. The best-case scenario for effective Magento SEO optimization would be to enable canonical tags alongside category paths. This way, a product will be accessible from all its assigned categories and won’t experience any SEO conflicts.
How do I create SEO-friendly URLs in Magento?
URLs optimized for SEO give the Google crawlers an idea of what the website is about. They tend to be succinct and keyword-rich.
But there’s more to SEO-friendly URLs. Here’s how to do SEO for Magento and help search engines understand your product catalog URLs without losing traffic or ranking position.
Suffix for Product and Category URLs
This new feature of Magento 2 allows changing URL suffixes for different product and category pages. To set it up, go to Stores > Configuration > Catalog > Catalog > Search Engine Optimization.
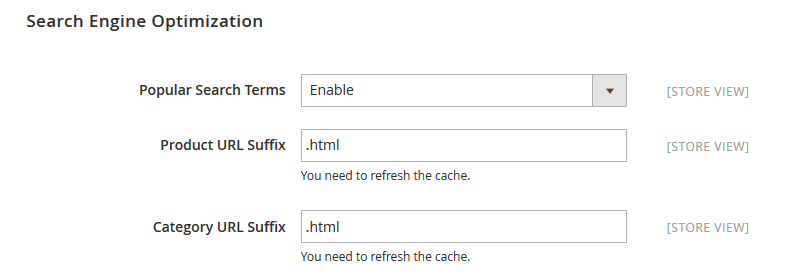
At the first glance, you might think of the feature as useless. No user will expect to see a different URL ending for product pages, and changing “.html” to “.com” will hardly add to the uniformity of your website links. On top of that, you’ll need to watch out for 404 errors after removing the suffix for old URLs and set redirects to new links.
However, merchants selling products overseas can benefit immensely from the feature. Different suffixes for the same product page will indicate the language version of the website, be it an “.en”, “.it”, or “.ru”. You can also disable the feature or change the “.html” suffix appearing by default if the feature somehow affects your international presence.
SEO-Driven URLs and Redirects
Clear and readable URL slugs make your website attractive to Google. And you’ll find the default settings of any CMS ruining product or category URLs for you with unnecessary words or complicated symbols.
Magento 2 allows you to customize any product or category URL by going Catalog > Products / Categories > {{Product}} / {{Category}} > Search Engine Optimization > URL Key.
If you suddenly want to change a link to the existing webpage, you can set up URL rewrites. Also known as redirects, Magento URL rewrites redirect any link with an URL to the new address. To set it up, go to Stores > Configuration > Catalog > Search Engine Optimization → select ‘No’ for ‘Use Categories Path for Product URLs and ‘Yes’ for Create Permanent Redirect for URLs.
Consider these few tips to optimize your ecommerce URL slugs:
- include your targeted keywords;
- make the hierarchy of your page clear (e.g., websitetitle.com/category-name/product)
- eliminate unnecessary synonyms and repetitive words, especially if your product and category names are the same (e.g., themaltmiller.com/ingredients/hops/whole-hops/whole-citra-hops/ → themaltmiller.com/ingredients/whole-citra-hops/)
- use hyphens (-) to separate words, not underscores (_) or any other characters.
Keep in mind: If you see an error “The value specified in the URL Key field would generate a URL that already exists”, you know that you have to use this setting to re-generate / rewrite the URL. It was quite a common issue in Magento 1; so if you’re still running on this obsolete version of the platform, Magento 2 migration will solve your problem with non-unique URLs.
How do I control crawling and indexing in Magento?
Use Magento’s robots.txt, meta robots, and XML sitemap settings to tell Google which pages to crawl and index. Configure them in the admin — no file editing needed.
Let’s look at the website the way Google does. First, it finds information by crawling billions of sources. Then, it organizes the info by indexing it. It scans the contents and keywords of the webpage and identifies the purpose of the page. Your SEO for Magento ranking efforts will make sense only after indexing, which makes a webpage appear in SERP (Search Engine Results Pages).
Magento SEO optimization tools can speed up the web indexing process. Let’s take a closer look at each one of them.
Robots.txt
A robots.txt file is basically your instruction for Google robots. The file contains user agents and directives (i.e., disallows, allows, crawl-delays, etc.) for how they should crawl your website. Alongside the SSL certification (the one adding a lock icon to your https:// URL and making your website more secure), robots.txt protocol has become a new Internet standard.

Magento 2 has made it supereasy to configure robots.txt file without downloading it and editing it as plain text. Every time you wish to add a new rule/directive for a crawler, go to Content > Design > Configuration > Global / Edit > Search Engine Robots. Instruct the default crawlers which pages you wish to index for website ranking and check back for changes.
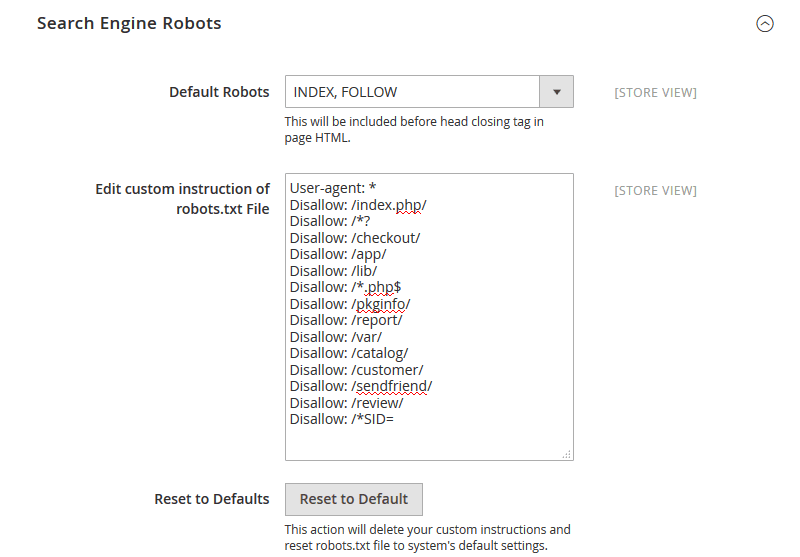
Meta Robots
Meta robots extend the functionality of a robots.txt protocol. They also suggest Google crawlers how they should behave on your website. Magento 2 offers four parameters that Google crawlers will understand:
| Parameter | What it does | When to use |
|---|---|---|
| INDEX, FOLLOW | The page is indexed and its links are crawled, passing link equity. This is Magento’s default. | Most public pages |
| NOINDEX, FOLLOW | The page isn’t indexed, but links on it are still crawled. | Thank-you / utility pages you don’t want ranked |
| INDEX, NOFOLLOW | The page is indexed, but links on it aren’t followed. | Pages linking to untrusted external sources |
| NOINDEX, NOFOLLOW | The page is neither indexed nor are its links followed. | Admin / technical pages |
Note: since 2019 Google treats nofollow (including meta-robots nofollow) as a hint rather than a strict directive, so it may still crawl such links at its discretion.
Mind that meta robots apply only to sets of pages in Magento 2, so you won’t be able to customize them for single webpages. You’ll also need to extend Magento functionality in case you’re looking for more meta robot parameters, like noimageindex, none, noarchive, etc.
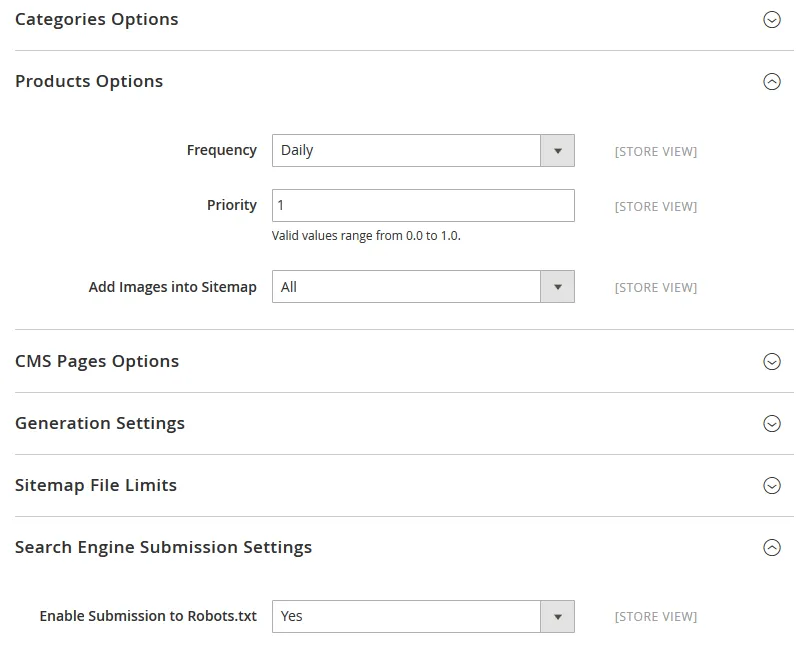
XML Sitemap
XML sitemaps provide an easy way for webmasters to notify the search engines of the pages available for crawling. You basically list all the URLs on your website (even the undiscoverable ones), prioritize info for a search engine, provide basic metadata about each URL.
Magento 2 has added an XML sitemap to its armory of SEO tools. All you need to do is go to Configuration > Catalog > XML Sitemaps. The options configuration page will allow you to define how frequently the sitemap is updated, set priorities for categories and products pages, and even add images to your sitemap.
Index faster and rank higher with Elogic
Hire a professional Magento developer and get a SEO module tailor-made to your e-store
Hire a developer nowHow do I optimize images for Magento SEO?
Add descriptive alt text to every image and compress files to keep pages fast. Both are quick wins for image search and Core Web Vitals.
Even if Andy Warhol himself creates the visual design of your store, the search engine won’t understand it without your help. Adding alt tags and optimizing your web images are the least you can do.
Alt Tags for SEO Images
Alt text (aka alt tags or alt attribute) is a description of an image. Initially used to improve web accessibility for visually impaired users, alt tags help a search engine understand the content of your images. So adding alt attributes is one of the underrated Magento 2 SEO tips to rank higher on Google Image Search and increase your website visibility.
Magento 2 allows you to add and edit alt text to any image. For product photos, go to Catalog > Products > {{product}} > Images and Videos > Alt Text. For logos, go to Stores > Configuration > General > Design > HTML Head > Header. Try to be descript and specific, and don’t overspam the tag with keywords.
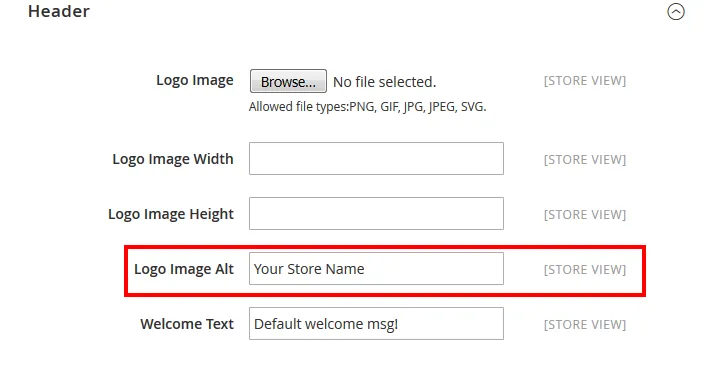
Image Optimization
The heavier the website, the worse the performance. And one of the ways to speed up your Magento 2 store is to compress images.
Unfortunately, Magento 2 preserves the legacy of Magento 1 and doesn’t provide an image compressor out-of-the-box. You’ll need to extend the functionality with a custom module or install an extension from an official marketplace (if it’s compatible with your store, of course).
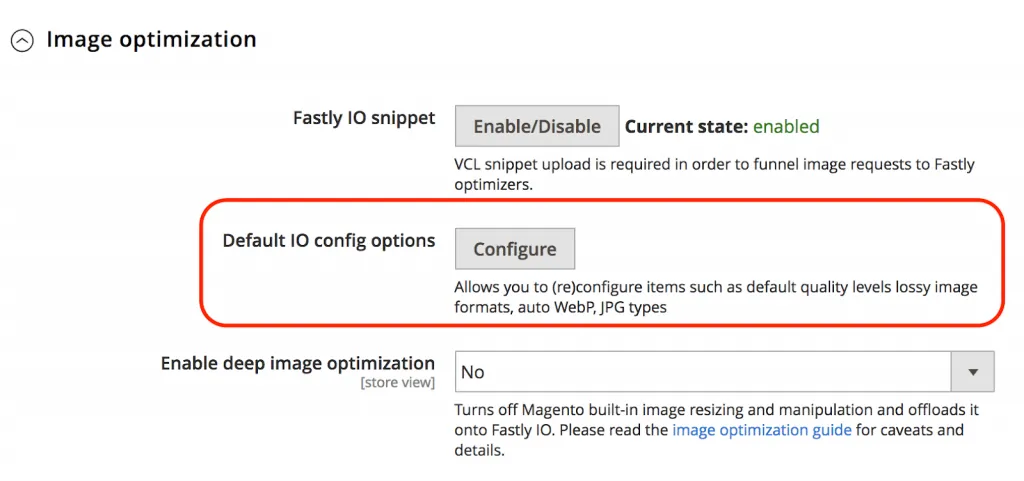
However, the lucky owners of Magento Commerce Cloud have one huge benefit: Fastly Image Optimizer.
- It supports most common image formats (PNG, JPEG, and GIF).
- Fastly IO helps to resize product photos and adapt their pixel ratios for responsive websites.
- The feature forces lossy conversions, i.e. serves smaller images for browsers (for instance, JPEG or WEBp format instead of PNG).
Among the many Magento Commerce Cloud features, Fastly IO is the strongest in terms of SEO and content management. To enable it, go to Stores > Settings > Configuration > Advanced > System > Full Page Cache > Fastly Configuration > Image Optimization.
The Only Magento 2 SEO Checklist You’ll Need
Feeling overwhelmed with all the SEO tips and settings? Indeed, technical SEO can be daunting and is something you constantly need to take care of. To make this process easier, we’ve made a handy Magento SEO checklist for you to keep track of all SEO tasks anytime.
Get a summary of all Magento 2 SEO settings
Share the checklist with your ecommerce team and rank #1 on Google faster!
Download in 1 clickBottom Line
If you’re having trouble gaining higher rankings on major search engines like Google, Baidu, or Yahoo!, keep up with the abovementioned Magento tips to unlock the true potential of your online store.
For stores running custom themes or operating at enterprise scale, an Adobe Silver Partner Magento consulting team can audit your specific setup and prioritize the highest-impact SEO fixes — often surfacing rendering issues that internal teams miss. If you’re weighing a larger move, see how SEO fits into building a B2B ecommerce marketplace.
The information covered in this blog post is just the tip of the iceberg and there are many other things to take into account when it comes to Magento SEO optimization. Thus, the best way to optimize your Magento 2 search engine optimization is to hire a Magento developer (or better an experienced development agency) that has vast experience in creating SEO-friendly websites. Planning the budget for that work? See our breakdown of ecommerce development cost.
Frequently Asked Questions
Is Magento good for SEO?
Yes — architecturally it’s one of the most controllable platforms, and
one of the easiest to break. Configured well it ranks strongly; misconfigured, it buries itself in
duplicate URLs.
Does Magento SEO help with AI search?
Directly. Complete structured data and clear, factual,
answer-first copy are what AI Overviews and assistants extract and cite.
Need a partner?
Elogic Commerce is an Adobe Solution Partner — see Adobe Commerce development, or our guide to choosing an Adobe Commerce B2B agency.

Get in Touch
Looking for a partner to grow your business? We are the right company to bring your webstore to success.